Epicurean Vegan

Healthy Eating for Discriminating Palates

Navigation
  • Home
  • About
  • Recipes
  • Information
    • What the heck is that?!
    • Watch & Learn
    • Calcium
    • Protein
  • Contact

Vegan and Gluten-Free Red Velvet Cupcakes

July 12, 2011 by epicureanvegan

Vegan and Gluten-Free Red Velvet Cupcakes --Epicurean Vegan
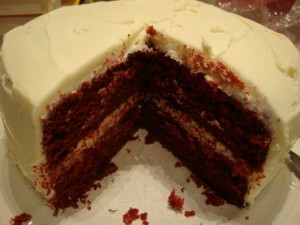
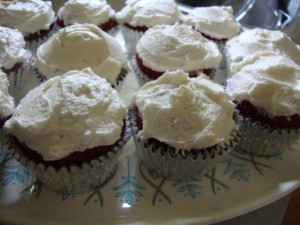
I used the same recipe for these, as the red velvet cake I made a couple of months ago. I wasn’t sure how making the batter into cupcakes would work out, but in the end, they  were delicious!! To begin with, it’s never easy to figure out how full to fill the muffin cups. I went with about 2/3 to 3/4 full, and I got 23 cupcakes. They puffed up a bit, so I recommend filling them halfway which will probably yield more than 24. These are certainly sinful and not something I recommend making on a weekly basis, but rather to enjoy as an occasional treat!

INGREDIENTS:
1 C gluten-free vanilla rice milk
1 tsp cider vinegar
2-1/2 C Betsy’s Baking Mix (recipe below)
1 tsp salt
1 tsp xanthan gum
1-1/2 cups sugar
1/2 C palm oil shortening
2 Tbs unsweetened cocoa powder
1-oz red food coloring
1/4 C + 3 Tbs unsweetened applesauce
1 tsp vanilla
1 Tbs distilled white vinegar
1 tsp baking soda
1 recipe butter cream frosting (below)
Betsy’s Making Mix: this makes 7-1/2 cups–remember, use just 2-1/2 cups of it.
3-3/4 C garbanzo bean  flour
2-1/4 C potato starch
1-1/2 C tapioca starch/flour
Buttercream Frosting:
1 C Earth Balance margarine
4 to 4-1/2 C confectioner’s sugar
Vanilla rice milk

DIRECTIONS:
Preheat oven to 350. Make your baking mix first: Combine all the flours in a large zip-lock bag. Using a whisk, blend them well. Then seal tightly and shake it vigorously for 1 minute. This mix will stay good for up to 3 months. Place muffin liners into muffin pan and set aside.

In a small bowl or measuring cup, combine the rice milk and cider vinegar to create “buttermilk” and set aside. In a small bowl, use a spoon to combine the cocoa powder and food coloring. (Keep in mind that 1 ounce is a full-sized bottle of food coloring). It will form a paste:

Vegan and Gluten-Free Red Velvet Cupcakes --Epicurean Vegan

In a large bowl, combine 2-1/2 cups of the baking mix, salt, and xanthan gum. In the bowl of a stand mixer, cream together the sugar and palm oil shortening. Add the applesauce and vanilla and cream everything together until mixture is light and creamy. Add the cocoa paste and mix well.

Vegan and Gluten-Free Red Velvet Cupcakes --Epicurean Vegan

Alternately, add the dry ingredients and the “buttermilk” mixture to the batter, beginning and ending with the dry ingredients. Pour the white vinegar into a small cup and sprinkle the baking soda over it. Immediately pour the fizzing combo into the cake batter and thoroughly mix it in.

Vegan and Gluten-Free Red Velvet Cupcakes --Epicurean Vegan

Fill each muffin cup about halfway with batter. I find that it’s easiest to hold the muffin cup in my hand and use a small spoon to drop filling in the cup. I then place it into the muffin pan. Works great and you can avoid getting batter on the pan.

Vegan and Gluten-Free Red Velvet Cupcakes --Epicurean Vegan

Bake for 30 minutes, or until an inserted toothpick comes out clean.

Vegan and Gluten-Free Red Velvet Cupcakes --Epicurean Vegan

Let cool completely before frosting.

To make the frosting cream the vegan margarine until smooth. Little by little, add the confectioner’s sugar. Add the vanilla rice milk 1-2 tablespoons at a time until you reach a thick consistency. I beat this for several minutes to not only cream all the margarine, but to make it good and fluffy.

Vegan and Gluten-Free Red Velvet Cupcakes --Epicurean Vegan

Layer the tops of the cupcakes with some frosting and enjoy!

Vegan and Gluten-Free Red Velvet Cupcakes
 
Print
I used the same recipe for these, as the red velvet cake I made a couple of months ago. I wasn't sure how making the batter into cupcakes would work out, but in the end, they were delicious!! To begin with, it's never easy to figure out how full to fill the muffin cups. I went with about ⅔ to ¾ full, and I got 23 cupcakes. They puffed up a bit, so I recommend filling them halfway which will probably yield more than 24. These are certainly sinful and not something I recommend making on a weekly basis, but rather to enjoy as an occasional treat!
Author: Epicurean Vegan
Ingredients
  • 1 C gluten-free vanilla rice milk
  • 1 tsp cider vinegar
  • 2-1/2 C Betsy’s Baking Mix (recipe below)
  • 1 tsp salt
  • 1 tsp xanthan gum
  • 1-1/2 cups sugar
  • ½ C palm oil shortening
  • 2 Tbs unsweetened cocoa powder
  • 1-oz red food coloring
  • ¼ C + 3 Tbs unsweetened applesauce
  • 1 tsp vanilla
  • 1 Tbs distilled white vinegar
  • 1 tsp baking soda
  • 1 recipe butter cream frosting (below)
  • Betsy’s Making Mix: this makes 7-1/2 cups–remember, use just 2-1/2 cups of it.
  • 3-3/4 C garbanzo bean flour
  • 2-1/4 C potato starch
  • 1-1/2 C tapioca starch/flour
  • Buttercream Frosting:
  • 1 C vegan margarine
  • 4 to 4-1/2 C confectioner’s sugar
  • Vanilla rice milk
Directions
  1. Preheat oven to 350.
  2. Make your baking mix first: Combine all the flours in a large zip-lock bag. Using a whisk, blend them well. Then seal tightly and shake it vigorously for 1 minute. This mix will stay good for up to 3 months. Place muffin liners into muffin pan and set aside.
  3. In a small bowl or measuring cup, combine the rice milk and cider vinegar to create “buttermilk” and set aside. In a small bowl, use a spoon to combine the cocoa powder and food coloring. (Keep in mind that 1 ounce is a full-sized bottle of food coloring). It will form a paste.
  4. In a large bowl, combine 2-1/2 cups of the baking mix, salt, and xanthan gum. In the bowl of a stand mixer, cream together the sugar and palm oil shortening. Add the applesauce and vanilla and cream everything together until mixture is light and creamy. Add the cocoa paste and mix well.
  5. Alternately, add the dry ingredients and the “buttermilk” mixture to the batter, beginning and ending with the dry ingredients. Pour the white vinegar into a small cup and sprinkle the baking soda over it. Immediately pour the fizzing combo into the cake batter and thoroughly mix it in.
  6. Fill each muffin cup about halfway with batter. I find that it's easiest to hold the muffin cup in my hand and use a small spoon to drop filling in the cup. I then place it into the muffin pan. Works great and you can avoid getting batter on the pan.
  7. Bake for 30 minutes, or until an inserted toothpick comes out clean.
  8. Let cool completely before frosting.
  9. To make the frosting cream the vegan margarine until smooth. Little by little, add the confectioner’s sugar. Add the vanilla rice milk 1-2 tablespoons at a time until you reach a thick consistency. I beat this for several minutes to not only cream all the margarine, but to make it good and fluffy.
  10. Layer the tops of the cupcakes with some frosting and enjoy!
3.5.3208

Filed Under: Desserts Tagged With: cupcakes, Earth Balance, gluten-free, red velvet cupcakes, Vegan

Vegan and Gluten-Free Red Velvet Cake

May 16, 2011 by epicureanvegan

Vegan and Gluten-Free Red Velvet Cake -- Epicurean VeganSome of you may recall when I made this cake about a year ago, I put in way, way too much of the flour mixture and a friend, who I had served it to, joked that I made him eat a brick. The cake was a disaster and apparently, it took me a year to get over it, but here it is. Wow, what a difference correctly following the recipe makes! 😉 This cake is outstanding! You’d never know it was gluten-free AND vegan! The cake was soft, moist, and not too sweet. (The icing will sure make up for that!) This is now going to be the family birthday cake for a while—it’s that good! Plus, I’ve completely redeemed myself and my friend told me he can no longer tease me about serving him a brick!

INGREDIENTS:
1 C gluten-free vanilla rice milk
1 tsp cider vinegar
2-1/2 C Betsy’s Baking Mix (recipe below)
1 tsp salt
1 tsp xanthan gum
1-1/2 cups sugar
1/2 C palm oil shortening
2 Tbs unsweetened cocoa powder
1 oz red food coloring
1/4 C + 3 Tbs unsweetened applesauce
1 tsp vanilla
1 Tbs distilled white vinegar
1 tsp baking soda
1 recipe butter cream frosting (below)
Betsy’s Making Mix: this makes 7-1/2 cups–remember, use just 2-1/2 cups of it.
3-3/4 C garbanzo bean  flour
2-1/4 C potato starch
1-1/2 C tapioca starch/flour
Buttercream Frosting:
1 C vegan margarine
4 to 4-1/2 C confectioner’s sugar
Vanilla rice milk

DIRECTIONS:
Preheat oven to 350. Make your baking mix first: Combine all the flours in a large zip-lock bag. Using a whisk, blend them well. Then seal tightly and shake it vigorously for 1 minute. This mix will stay good for up to 3 months.

Grease 2 9″ cake pans, line the bottoms with parchment paper, then grease the parchment paper; set aside. In a small bowl or measuring cup, combine the rice milk and cider vinegar to create “buttermilk” and set aside. In a small bowl, use a spoon to combine the cocoa powder and food coloring. (Keep in mind that 1 ounce is a full-sized bottle of food coloring). It will form a paste:

Vegan and Gluten-Free Red Velvet Cake -- Epicurean VeganIn a large bowl, combine 2-1/2 cups of the baking mix, salt, and xanthan gum. In the bowl of a stand mixer, cream together the sugar and palm oil shortening. Add the applesauce and vanilla and cream everything together until mixture is light and creamy. Add the cocoa paste and mix well.

Vegan and Gluten-Free Red Velvet Cake -- Epicurean VeganAlternately, add the dry ingredients and the “buttermilk” mixture to the batter, beginning and ending with the dry ingredients. Pour the white vinegar into a small cup and sprinkle the baking soda over it. Immediately pour the fizzing combo into the cake batter and thoroughly mix it in. Evenly divide the batter into the two cake pans.

Vegan and Gluten-Free Red Velvet Cake -- Epicurean VeganBake for 30-35 minutes, or until a toothpick inserted into the center of each cake comes out clean. Let the cakes cool completely on a rack before turning them out of the pans.

Vegan and Gluten-Free Red Velvet Cake -- Epicurean VeganOnce cooled, turn over the pans and remove the parchment paper. Take a large plate and place it upside down on the bottom of one of the cakes (that will be upside down on the rack). Flip over so the cake is face up on the plate.

Vegan and Gluten-Free Red Velvet Cake -- Epicurean VeganTo make the frosting cream the margarine until smooth. Little by little, add the confectioner’s sugar. Add the vanilla rice milk 1-2 tablespoons at a time until you reach a thick consistency.

Vegan and Gluten-Free Red Velvet Cake -- Epicurean VeganFrost the top and sides of the cake that is on the plate. Lay it pretty thick, especially on the top. Carefully place the 2nd cake on top and frost that one.

Vegan and Gluten-Free Red Velvet Cake -- Epicurean Vegan

Vegan and Gluten-Free Red Velvet Cake -- Epicurean Vegan

Slice and enjoy! Cover the leftovers and store in the refrigerator.

Vegan and Gluten-Free Red Velvet Cake -- Epicurean Vegan

Recipe source (cake only): Living Without

Vegan and Gluten-Free Red Velvet Cake
 
Print
This cake from Living Without is outstanding! You'd never know it was gluten-free AND vegan! The cake was soft, moist, and not too sweet. (The icing will sure make up for that!) This is now going to be the family birthday cake for a while---it's that good!
Author: Epicurean Vegan
Ingredients
  • 1 C gluten-free vanilla rice milk
  • 1 tsp cider vinegar
  • 2-1/2 C Betsy's Baking Mix (recipe below)
  • 1 tsp salt
  • 1 tsp xanthan gum
  • 1-1/2 cups sugar
  • ½ C palm oil shortening
  • 2 Tbs unsweetened cocoa powder
  • 1 oz red food coloring
  • ¼ C + 3 Tbs unsweetened applesauce
  • 1 tsp vanilla
  • 1 Tbs distilled white vinegar
  • 1 tsp baking soda
  • 1 recipe butter cream frosting (below)
  • Betsy's Making Mix: this makes 7-1/2 cups--remember, use just 2-1/2 cups of it.
  • 3-3/4 C garbanzo bean flour
  • 2-1/4 C potato starch
  • 1-1/2 C tapioca starch/flour
  • Buttercream Frosting:
  • 1 C vegan margarine
  • 4 to 4-1/2 C confectioner's sugar
  • Vanilla rice milk
Directions
  1. Preheat oven to 350. Make your baking mix first: Combine all the flours in a large zip-lock bag. Using a whisk, blend them well. Then seal tightly and shake it vigorously for 1 minute. This mix will stay good for up to 3 months.
  2. Grease 2 9" cake pans, line the bottoms with parchment paper, then grease the parchment paper; set aside. In a small bowl or measuring cup, combine the rice milk and cider vinegar to create "buttermilk" and set aside. In a small bowl, use a spoon to combine the cocoa powder and food coloring. (Keep in mind that 1 ounce is a full-sized bottle of food coloring). It will form a paste.
  3. In a large bowl, combine 2-1/2 cups of the baking mix, salt, and xanthan gum. In the bowl of a stand mixer, cream together the sugar and palm oil shortening. Add the applesauce and vanilla and cream everything together until mixture is light and creamy. Add the cocoa paste and mix well.
  4. Alternately, add the dry ingredients and the "buttermilk" mixture to the batter, beginning and ending with the dry ingredients. Pour the white vinegar into a small cup and sprinkle the baking soda over it. Immediately pour the fizzing combo into the cake batter and thoroughly mix it in. Evenly divide the batter into the two cake pans
  5. Bake for 30-35 minutes, or until a toothpick inserted into the center of each cake comes out clean. Let the cakes cool completely on a rack before turning them out of the pans.
  6. Once cooled, turn over the pans and remove the parchment paper. Take a large plate and place it upside down on the bottom of one of the cakes (that will be upside down on the rack). Flip over so the cake is face up on the plate.
  7. To make the frosting cream the margarine until smooth. Little by little, add the confectioner's sugar. Add the vanilla rice milk 1-2 tablespoons at a time until you reach a thick consistency.
  8. Frost the top and sides of the cake that is on the plate. Lay it pretty thick, especially on the top. Carefully place the 2nd cake on top and frost that one.
  9. Slice and enjoy! Cover the leftovers and store in the refrigerator.
3.5.3208

Filed Under: Desserts Tagged With: buttercream, dairy-free, Earth Balance, easy, egg-free, gluten-free, Living Without, Red Velvet Cake, Vegan

Product Review: Bob’s Red Mill Gluten Free Pizza Crust

May 12, 2011 by epicureanvegan

I’ve been wanting to try gluten-free pizza crust for quite some time now. I’d like to reduce to the amount of gluten I eat, so I was anxious to try this mix from Bob’s Red Mill. The mix requires water, oil and eggs. However, it suggests using 2 tablespoons of flaxseed meal and water as an egg replacement. I used Ener-G Egg Replacer. The package also comes with a yeast packet. The crust makes 2 12″ pizzas, or one 26″ pizza. Since The Husband is in San Francisco for work, the Sixth Grader and me decided to make a couple of pizzas tonight.

This is a simple process: combine the egg-replacer with water; set aside. In a large bowl whisk together 1-1/2 cups warm water with the yeast and let it sit a few minutes. Add the egg-replacer mixture and 2 Tbs olive oil to the yeast mixture. Stir in the pizza crust mix. I don’t recommend a whisk, as the dough will collect inside of it; use a wooden spoon. Divide the dough into two, cover with plastic wrap and let rise for 20 minutes.

The dough didn’t rise all that much after 20 minutes, but it could be that the dough wasn’t placed in a warm enough area. Preheat oven to 425. Grease a baking sheet/pizza pan and wet your hands with some water. Spread the dough onto the pan. The dough will have a spongy-mashed potato texture and having wet hands is critical when trying to spread it out. Bake for 7-9 minutes.

Top with your favorite sauce and toppings. The kid went with Tofurky Italian Sausage and FYH Mozzarella:

I also like to use Contadina sauce:

The directions said to bake for 16-18 minutes. About 14-15 minutes worked for us, but ovens run differently, so keep an eye on it.

I debated on what kind of pizza to make, but in the end, I went with spinach and mushrooms with truffle oil (big surprise, huh?)

So the verdict is . . . great. We really liked this crust a lot. The edges are crispy, like a crusty bread and the rest if softer and chewier.  The crunchy edge is really the only difference from regular pizza crust. I would regularly use this mix as an alternative to regular pizza dough. I think using this mix is much easier than making your own gluten-free pizza crust and highly recommend this one.

Filed Under: Product Reviews Tagged With: Bob's Red Mill, easy, Follow Your Heart, gluten-free, pizza crust, pizza dough, Tofurky

Creamy Tofu-Port Spread

May 2, 2011 by epicureanvegan

Creamy Tofu-Port Spread -- Epicurean VeganI love experimenting with making vegan cheeses and spreads and this one is so easy and delicious. It’s ideal as a sandwich or wrap condiment, or a dip for crackers and veggies (particularly, veggie crackers)! I also think it’d be great on a toasted bagel, English muffin, or toast.

INGREDIENTS:
14-oz tofu, drained, pressed, and cubed
2/3 C nutritional yeast flakes
3 Tbs yellow or red miso (I used yellow)
3 Tbs tahini
1 Tbs lemon juice
2 tsp Worcestershire sauce
1/4 C port wine
Salt, to taste

DIRECTIONS:
Add everything into the food processor and blend until smooth and creamy. Store in an airtight container in the refrigerator. Makes about 2-1/2 cups. Enjoy!

Creamy Tofu-Port Spread
 
Print
I love experimenting with making vegan cheeses and spreads and this one is so easy and delicious. It's ideal as a sandwich or wrap condiment, or a dip for crackers and veggies (particularly, veggie crackers)! I also think it'd be great on a toasted bagel, English muffin, or toast.
Author: Epicurean Vegan
Ingredients
  • 14-oz tofu, drained, pressed, and cubed
  • ⅔ C nutritional yeast flakes
  • 3 Tbs yellow or red miso (I used yellow)
  • 3 Tbs tahini
  • 1 Tbs lemon juice
  • 2 tsp Worcestershire sauce
  • ¼ C port wine
  • Salt, to taste
Directions
  1. Add everything into the food processor and blend until smooth and creamy. Store in an airtight container in the refrigerator. Makes about 2-1/2 cups. Enjoy!
3.5.3208


Filed Under: Appetizers, Dressings/Condiments Tagged With: fast and easy, gluten-free, miso, nutritional yeast, Port wine, tahini, tofu

Chickpea Havarti Spread

April 10, 2011 by epicureanvegan

Chickpea Havarti Spread -- Epicurean VeganThis spread can easily be called a dip as well. It almost has a chowder-like taste to it. From the Ultimate Uncheese Cookbook, this recipe is simple and delicious! This would also make a great condiment for sandwiches or wraps, too.

INGREDIENTS:
1 C water
2 C drained cooked or canned chickpeas (one 15 or 16 oz can)
1/2 C raw cashews
1/3 C nutritional yeast flakes
2 tsp onion powder
1 tsp salt
1/2 tsp garlic powder
1/2 tsp ground dill seed
1/2 tsp whole celery seed
1/4 C lemon juice

DIRECTIONS:
Place all ingredients in a blender and process until smooth. Transfer to a medium sauce pan and cook over medium heat, stirring often until very thick, about 15-20 minutes.

Chickpea Havarti Spread -- Epicurean Vegan

Remove from heat and cool a few minutes. Pour into an air tight container and chill for several hours to overnight.

Chickpea Havarti Spread -- Epicurean Vegan

Enjoy on crackers, as a vegetable dip, or as a sandwich condiment. Makes 2 cups.

Chickpea Havarti Spread
 
Print
This spread can easily be called a dip as well. It almost has a chowder-like taste to it. From the Ultimate Uncheese Cookbook, this recipe is simple and delicious! This would also make a great condiment for sandwiches or wraps, too.
Author: Epicurean Vegan
Ingredients
  • 1 C water
  • 2 C drained cooked or canned chickpeas (one 15 or 16 oz can)
  • ½ C raw cashews
  • ⅓ C nutritional yeast flakes
  • 2 tsp onion powder
  • 1 tsp salt
  • ½ tsp garlic powder
  • ½ tsp ground dill seed
  • ½ tsp whole celery seed
  • ¼ C lemon juice
Directions
  1. Place all ingredients in a blender and process until smooth. Transfer to a medium sauce pan and cook over medium heat, stirring often until very thick, about 15-20 minutes.
  2. Remove from heat and cool a few minutes. Pour into an air tight container and chill for several hours to overnight.
  3. Enjoy on crackers, as a vegetable dip, or as a sandwich condiment. Makes 2 cups.
3.5.3208

Filed Under: Appetizers, Dressings/Condiments Tagged With: Chickpeas, dairy-free, dip, easy, garbanzo beans, gluten-free, nutritional yeast, party food, Ultimate Uncheese Cookbook, Vegan

Tomato and Cheez Souffle

March 2, 2011 by epicureanvegan

Tomato and Cheez Souffle -- Epicurean VeganWe’ve all heard about disasters involving souffles, but this is one souffle that’s pretty difficult to screw up. This comes from The Ultimate Uncheese Cookbook and it really can’t get any easier than this. The recipe calls for a 2-quart baking or souffle dish. A square 8″ baking dish is 2 quarts, but I soon realized that the sides need to be higher. I ended up using less bread and tomatoes, but the same amount of sauce. Next time I’ll use a bigger baking dish,  but it still came out amazing. The taste and texture is a lot like lasagna and I think adding some spinach and mushrooms would be ideal!

INGREDIENTS:
1-1/2 C water
1/2 C roasted red peppers (skins and seeds removed) or pimento pieces (I used a mixture of both)
1/2 C raw cashews
3 Tbs nutritional yeast flakes
3 Tbs lemon juice
2 Tbs nonalcoholic white wine (I used white cooking wine)
1-1/2 tsp onion powder
1-1/4 tsp salt
1/2 tsp dry mustard
1/2 tsp thyme
1/2 tsp garlic powder
Black pepper, to taste
6-9 slices whole-wheat or rice bread (easily make it gluten-free)!
3 ripe tomatoes, sliced

DIRECTIONS:
Preheat oven to 375. In a blender, combine all the ingredients except the bread and tomatoes. Lightly oil a 2-quart souffle dish. Layer 2-3 slices of bread on the bottom, followed by sliced tomatoes. Pour 1/3 of the sauce on top and repeat layers two more times.

Tomato and Cheez Souffle -- Epicurean Vegan

Bake until lightly puffed and golden brown, about 45-50 minutes. It’s that easy!

Tomato and Cheez Souffle -- Epicurean Vegan

Tomato and Cheez Souffle
 
Print
We've all heard about disasters involving souffles, but this is one souffle that's pretty difficult to screw up. This comes from The Ultimate Uncheese Cookbook and it really can't get any easier than this. The recipe calls for a 2-quart baking or souffle dish. A square 8" baking dish is 2 quarts, but I soon realized that the sides need to be higher. I ended up using less bread and tomatoes, but the same amount of sauce. Next time I'll use a bigger baking dish, but it still came out amazing. The taste and texture is a lot like lasagna and I think adding some spinach and mushrooms would be ideal!
Author: Epicurean Vegan
Ingredients
  • 1-1/2 C water
  • ½ C roasted red peppers (skins and seeds removed) or pimento pieces (I used a mixture of both)
  • ½ C raw cashews
  • 3 Tbs nutritional yeast flakes
  • 3 Tbs lemon juice
  • 2 Tbs nonalcoholic white wine (I used white cooking wine)
  • 1-1/2 tsp onion powder
  • 1-1/4 tsp salt
  • ½ tsp dry mustard
  • ½ tsp thyme
  • ½ tsp garlic powder
  • Black pepper, to taste
  • 6-9 slices whole-wheat or rice bread (easily make it gluten-free)!
  • 3 ripe tomatoes, sliced
Directions
  1. Preheat oven to 375. In a blender, combine all the ingredients except the bread and tomatoes. Lightly oil a 2-quart souffle dish. Layer 2-3 slices of bread on the bottom, followed by sliced tomatoes. Pour ⅓ of the sauce on top and repeat layers two more times.
  2. Bake until lightly puffed and golden brown, about 45-50 minutes. It's that easy!
3.5.3208

Filed Under: Dinners Tagged With: egg-free, fast and easy, gluten-free, souffle, soy-free, tomatoes, Ultimate Uncheese Cookbook

Product Review: Solterra Gluten-Free, Dairy-Free Pizza

February 3, 2011 by epicureanvegan

First I saw “Vegan Cheese Pizza”, then I saw it’s made with daiya cheese and I knew, this pizza had to be mine. Well, mine and the kid’s. We are always on the lookout for vegan pizzas, but I think we’ve had pretty good luck so far with the Tofurky one. From Solterra, this gluten-free, soy-free, and dairy-free 8″ pizza will run you $4.99 at Whole Foods (and probably at least a buck cheaper in other places) and offers a unique way of cooking it. You leave the pizza in the packaging, just peel back the front/top paper to reveal a plastic window over the pizza.

At 450 degrees, place the pizza directly on the oven rack and bake for only about 5-7 minutes. After about 6 minutes, it didn’t look done, but I think it was–just was hard to tell through the plastic.

I ended up burning the edges quite a bit, so I just cut those off–the rest of perfect. In fact, it was pretty darn good! We liked the thin crust and of course, the daiya cheese.

I would certainly buy this pizza again and next time, I won’t over cook it! Solterra’s products are all gluten-free, soy-free, and nut-free, with several products that are dairy-free as well. Click HERE for nutritional information.

Filed Under: Product Reviews Tagged With: dairy-free, frozen pizza, gluten-free, nut-free, Solterra, soy-free, Vegan

Product Review: Lillabee Classic Yellow Cake Mix

November 8, 2010 by epicureanvegan

Vegan MoFo, Day 8

I picked up this dairy-free, gluten-free cake mix in Boulder a while back. In fact, Lillabee is a Boulder-based company. In addition to having no dairy or gluten, this cake mix is soy-free and all natural, meaning non-GMO. When I picked up a bag, I didn’t realize that the recipe requires 2 eggs, but thankfully, Ener-G Egg Replacer came to the rescue!

Lillabee’s aim is to provide delicious baked goods you make at home that are allergy-friendly. Other products include: Fudgy Brownies, Anytime Muffins, and Perfect Pancakes/Waffles.

So included in the bag is a sugar mixture (about a cup’s worth), the baking mix and directions:

Required ingredients: 2 eggs (3 tsp egg replacer + 4 Tbs water), 6 Tbs Earth Balance margarine, 1 tsp vanilla extract, 3/4 C non dairy milk, 2 tsp apple cider vinegar or lemon juice and an 8″ cake pan or muffin pan. It was a breeze to throw together–about 5 minutes using the mixer, then 45 minutes in the oven.

It smelled quite delish as it baked! I let it cool for about an hour and then sliced it up. It was wonderful! Very sponge-y and sugary and quite delightful. You can also add things to the batter before baking it, like blueberries, or other fruit.

So where can you find this decadent vegan dessert? If you live in Boulder (or close by) you can purchase it at Dish Gourmet and Caffe Victoria. But you can also order directly from Lillabee.  I was very impressed and next time we’re in Boulder, I will definitely pick some more up.

Filed Under: Product Reviews, Vegan MoFo Tagged With: cake mix, dairy-free, egg-free, gluten-free, Lillabee, soy-free

Product Review: Amy’s Non-Dairy Pizza with Rice Crust

October 27, 2010 by epicureanvegan

I cruised the frozen section of my favorite health food store for something new to try that promised to be vegan deliciousness. I came across Amy’s Gluten-Free and Non-Dairy Cheeze Pizza with Rice Crust. Sounded promising, especially since Amy scored with the non-dairy mac and cheeze. I decided to overlook the $6.99 price tag and give it a try.

I preheated the oven to 425, as instructed and inspected the 7″ pizza. It looked enticing with more cheese than I was expecting—most frozen pizzas can be sparse on the toppings, as was the case with Amy’s No Cheese Pizza.

The instructions suggest baking the pizza for 8-10 minutes, then “carefully remove pizza directly under the broiler. Broil for 45-60 seconds, just enough to melt cheese.” Well, this isn’t easy to do. I don’t recommend holding it up to the broiler–too hot. So I left the pizza on the rack, closed the oven door and let the broiler work its toasting/melting magic. The results were less than stellar. It’s pretty hard to melt the cheese without burning the crust in the process.

(Yes, the above pic is the baked pizza–I know, kind of hard to tell . . . see burnt edge of crust).

Anyway, I never let a little charred bread get the best of me, so I sliced it up and dug in. Drumroll, please. . .

It didn’t  move me. I did not do my happy vegan food dance that I am known to do when yummy vegan food leaves me speechless. This left me wanting some flavor. I was tempted to sprinkle on some Daiya cheese and throw it back in the oven, but after spending $7, I wasn’t going to add more to it by using up some of my coveted vegan shreds. (The back of the box even says, “And of course you can add your own favorite toppings!”) Not for that price. The crust was ok–a little too soggy in the middle. There just wasn’t any flavor—nothing. Pretty disappointing, especially for the cost. Oh well. So far it seems Amy can’t quite master the vegan pizza—but I will say, that’s not an easy task. However, I wonder since they use Daiya in the mac and cheeze, why can’t they use it for the pizza?

Click HERE for a list of the ingredients.

Filed Under: Product Reviews Tagged With: Amy's Kitchen, gluten-free, non-dairy, pizza

Product Review: Amy’s Rice Macaroni with Dairy Free Cheeze

September 13, 2010 by epicureanvegan

When I saw that this product made it as a readers’ fave in the latest issue of Vegetarian Times, I did a tentative happy-vegan-food dance. It sounded promising, especially since it’s made with Daiya cheese. Plus, it’s gluten-free. So I picked one up for $3.69. It was practically burning a hole through my reusable grocery bag on the way home. I couldn’t get it in the microwave fast enough. Then the moment of truth . . .

I did a full-fledged, unadulterated, happy-vegan-food dance like no other. Never in my life would I have thought there’d be a delicious vegan mac and cheese that rivals that of the real deal. Unbelievable. Even The Husband was hovering, hoping that I would share more than just the one tiny bite I had given him. No way.

Oh, man. Good stuff. It took me a few minutes to recover and wipe the cheeze from my face–I was not above licking the cardboard dish clean, nor am I embarrassed to admit that. It was creamy and tasted just like the real thing. You can cook it in the oven for 25-30 minutes (I had no patience for that) or in the microwave for about 4 minutes.

Alas, like everything delicious, it comes with a price. One 8-ounce container brings with it 520 calories (I better go for another run today), but it’s actually comparable to regular mac n’ cheese. Total fat: 22g, 5g of saturated fat and no trans fat Sodium: 740mg, Carbs: 72g, Protein: 8g, but hey, NO cholesterol! 🙂 Overall, with no dairy, no soy and no gluten, it’s an indulgence I can handle every once in a while. (Glad I bought two)!

Filed Under: Product Reviews Tagged With: Amy's Kitchen, dairy-free, daiya, gluten-free

  • « Previous Page
  • 1
  • …
  • 4
  • 5
  • 6
  • 7
  • Next Page »

Connect

  • Email
  • Facebook
  • Pinterest
  • Twitter

The Epicurean Vegan is devoted to those wanting to eat healthy, save animals, and reduce their carbon footprint. My decision to go vegan started out as a quest to get healthier, but the more I learned about veganism, the more I realized how damaging the meat and dairy industries are to the environment and, of course, the animals. And it is for these reasons, that I would never go back to eating or wearing animal products. Ever.
Read More

Subscribe

Enter your email address to receive recipes to your inbox.

Links To Visit

Animal Place Sanctuary
Disease Proof
Doctor Yourself
More....

Top Posts & Pages

  • Hard Cashew Cheese
  • Creamy Dill and Chive Potato Salad
  • What the heck is that?!
  • Vegan Brie
  • Cream Cheese and Jalapeno Empanadas

Categories

Archives

Popular Posts

StudioPress Premium WordPress Themes: Foodie Theme

© 2025 · Epicurean Vegan · Designed by: Upperdale Designs on the Genesis Framework· WordPress · Log in · Return to top of page